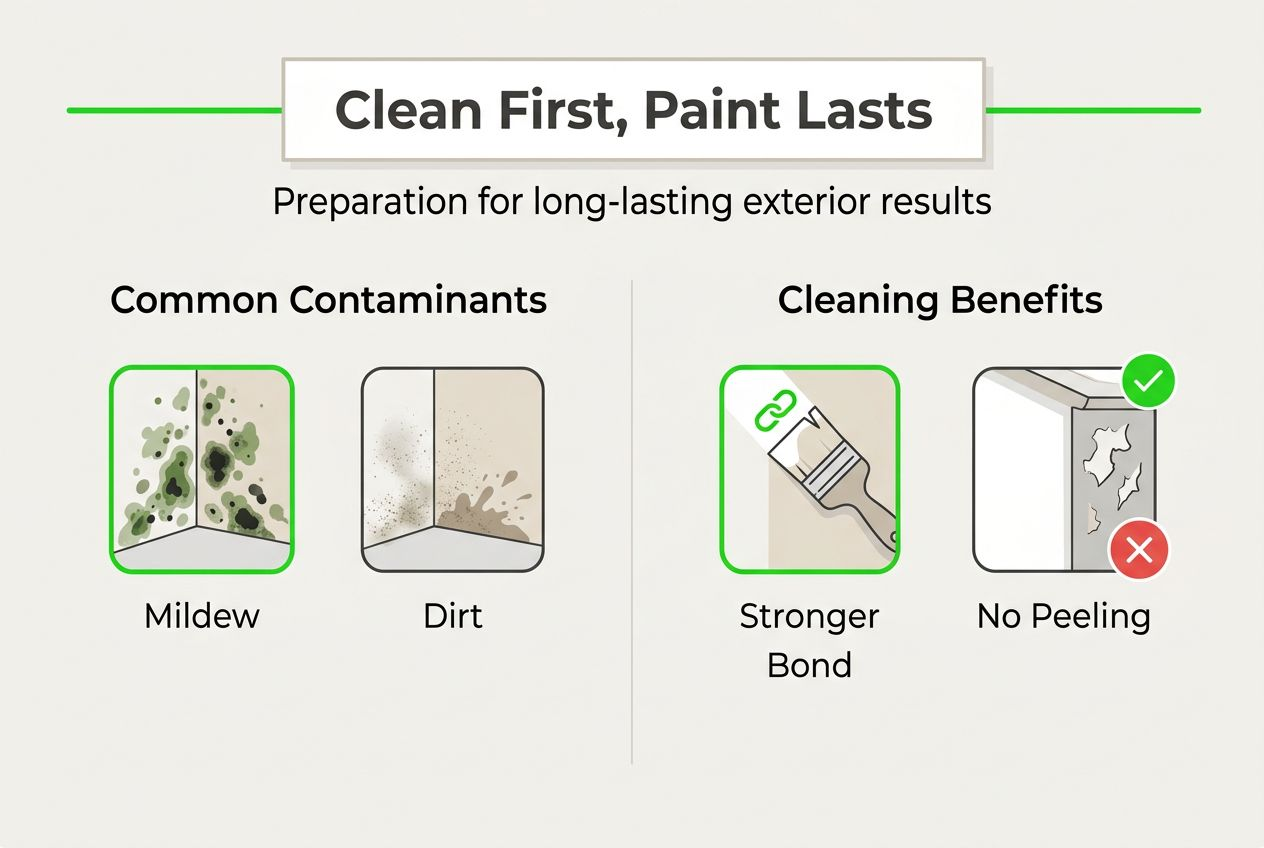
Skipping exterior cleaning before painting is the hidden reason why fresh paint peels within months instead of lasting years. Most homeowners don’t realize that dirt, mildew, and old residue create an invisible barrier preventing new paint from bonding properly to surfaces. The result? Thousands of dollars wasted on premature repainting and repairs that could have been avoided with proper surface preparation. Understanding why cleaning matters and how to do it correctly transforms your painting project from a temporary fix into a lasting investment that protects your Citrus County home for decades.
Table of Contents
- The Impact Of Surface Cleanliness On Paint Adhesion And Longevity
- Common Exterior Contaminants And Best Cleaning Methods Before Painting
- How Cleaning Before Painting Prevents Common Problems Like Peeling And Blistering
- Practical Steps And Tips To Clean Your Home Exterior Effectively Before Painting
- Why Choose Professional Exterior Cleaning Services Before Painting
- FAQ
Key takeaways
| Point | Details |
|---|---|
| Cleaning extends paint life | Proper pre-paint washing boosts paint durability by up to 30%, saving thousands in premature repainting costs. |
| Contaminants prevent adhesion | Dirt, mildew, and chalking create barriers that stop paint from bonding to surfaces, leading to peeling and flaking. |
| Method selection matters | Using low-pressure washing techniques protects delicate siding while removing contaminants effectively. |
| Timing affects results | Cleaning at least 24 to 48 hours before painting ensures surfaces dry completely for optimal paint adhesion. |
| Professional help reduces risk | Expert cleaning services provide specialized equipment and knowledge to prepare surfaces safely without damage. |
The impact of surface cleanliness on paint adhesion and longevity
Paint adheres through molecular bonding between the coating and the surface beneath. When contaminants like dirt, mildew, or chalking residue sit between paint and siding, they act as release agents that prevent this crucial bond from forming. The paint essentially sticks to the dirt layer instead of the actual surface, creating a weak connection that fails under normal weather stress. Within months, you’ll notice bubbling, peeling, or entire sections flaking off despite using premium paint products.
The consequences of poor adhesion extend beyond aesthetics. Moisture seeps behind poorly bonded paint, accelerating rot in wood siding and corrosion in metal surfaces. Your paint job that should protect your home for 7 to 10 years might need replacement in just 2 to 3 years. The financial impact compounds quickly when you factor in labor costs, material waste, and potential structural damage from moisture infiltration. Thorough pre-paint washing boosts paint life by up to 30%, transforming a mediocre paint job into a durable protective barrier.
Citrus County’s humid subtropical climate creates perfect conditions for contaminant buildup that sabotages paint adhesion. Understanding which substances must be removed helps you plan an effective cleaning strategy:
- Mildew and mold spores that continue growing beneath paint layers
- Algae deposits that create slick, non-porous surfaces
- Chalking residue from weathered old paint that powders off
- Salt accumulation from coastal moisture that attracts humidity
- Dirt and pollen embedded in textured siding surfaces
Pro Tip: After cleaning, run your hand across the surface. If you see white powder or feel grit, the surface isn’t ready for paint yet and needs additional cleaning.
Inspecting surfaces post-cleaning verifies readiness and prevents wasted effort. Look for uniform color without dark streaks, smooth texture without rough patches, and complete dryness before proceeding. Taking time to confirm cleanliness now saves exponentially more time fixing paint failures later. The pre-paint washing benefits become evident when your paint job still looks fresh years after application while neighbors who skipped cleaning face costly do-overs.
Common exterior contaminants and best cleaning methods before painting
Citrus County’s climate creates specific contamination challenges that differ from drier regions. High humidity promotes mildew growth year-round, while proximity to the Gulf brings salt-laden air that deposits corrosive residue on exterior surfaces. Algae thrives in shaded areas, creating green or black staining that looks like dirt but requires specialized treatment. Chalking occurs when old paint breaks down under UV exposure, leaving a powdery film that must be completely removed before new paint application. Understanding these contaminants helps you select appropriate cleaning methods.
Different surfaces and contamination levels require tailored approaches. This comparison helps match cleaning methods to your specific situation:
| Method | Best For | Advantages | Limitations |
|---|---|---|---|
| Soft washing | Vinyl, stucco, painted wood | Gentle, thorough cleaning without damage | Requires specialized equipment and solutions |
| Pressure washing | Concrete, brick, unpainted surfaces | Fast removal of heavy buildup | Can damage softer materials if misused |
| Detergent application | All surfaces with mildew | Kills organic growth at root level | Needs proper rinsing to avoid residue |
| Hand scrubbing | Small areas, delicate trim | Maximum control and precision | Time-intensive for large projects |
The low-pressure washing approach combines cleaning power with surface protection, making it ideal for most residential pre-paint preparation. This method uses specialized nozzles and cleaning solutions to lift contaminants without the surface damage risks associated with high-pressure equipment.
Follow this systematic process for effective pre-paint surface cleaning:
- Inspect entire exterior to identify problem areas and contamination types
- Test cleaning method on inconspicuous area to verify safety
- Apply appropriate cleaning solution and allow proper dwell time
- Rinse thoroughly from top to bottom using correct pressure settings
- Verify complete removal of contaminants before surfaces dry
Pro Tip: Avoid high-pressure settings above 1,500 PSI on vinyl siding, as excessive force can crack panels or drive water behind the siding into wall cavities.
Detergents play a crucial role beyond simple dirt removal. Specialized formulas break down organic growth like mildew and algae at the cellular level, preventing regrowth beneath new paint. The right detergent also helps lift chalking residue that water alone cannot remove. Balancing water pressure with chemical action creates thorough cleaning without surface damage. Understanding types of exterior cleaning methods available helps you choose the most effective approach for your home’s specific needs while following pressure washing safety tips to protect both surfaces and people.
How cleaning before painting prevents common problems like peeling and blistering
Paint failures follow predictable patterns based on contamination types left on surfaces. Mildew beneath paint creates blistering as the organisms release moisture and gases while continuing to grow. Dirt particles prevent uniform adhesion, causing localized peeling where the paint never properly bonded. Chalking residue acts like powder between two surfaces trying to stick together, resulting in wholesale flaking as the weak bond fails. Each contaminant type creates specific failure modes that cleaning prevents.
The financial impact of paint problems caused by inadequate cleaning adds up quickly:
| Contaminant Type | Typical Paint Problem | Average Repair Cost | Prevention Method |
|---|---|---|---|
| Mildew/mold | Blistering, dark spots | $800 to $2,500 per wall | Antimicrobial wash treatment |
| Dirt/grime | Peeling, poor coverage | $1,200 to $3,000 per side | Thorough pressure washing |
| Chalking residue | Flaking, color variation | $1,500 to $4,000 full exterior | Chemical stripping or power washing |
| Salt deposits | Corrosion, bubbling | $2,000 to $5,000 with substrate repair | Detergent wash and neutralization |
These repair costs don’t include the original painting investment wasted when premature failure occurs. Proper cleaning prevents peeling, flaking, and blistering paint by eliminating the root causes before they compromise your new paint job.
Avoid these common paint problems through systematic preparation:
- Conduct thorough visual inspection identifying all contaminated areas requiring attention
- Select appropriate cleaning method based on surface material and contamination severity
- Apply cleaning solutions at proper concentrations and allow adequate dwell time
- Rinse completely using correct technique to remove all loosened contaminants
- Verify surface dryness and cleanliness before proceeding with primer or paint
- Address any remaining problem areas with spot cleaning or additional treatment
Cleaning reduces moisture retention by removing organic materials that absorb and hold water against surfaces. Mildew and algae act like sponges, keeping siding damp long after rain stops. This constant moisture accelerates paint breakdown and promotes rot in underlying materials. Removing these contaminants allows surfaces to dry properly between weather events, extending both paint life and structural integrity.
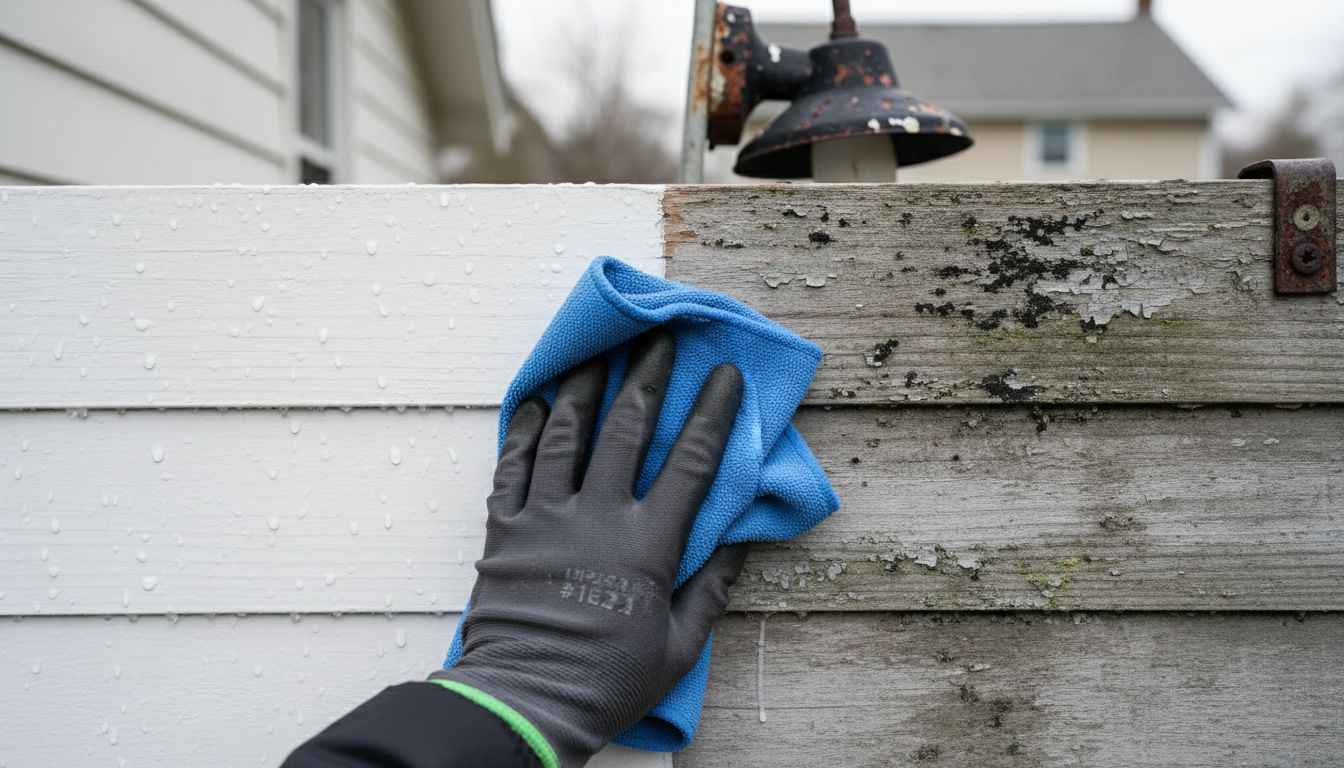
Surface profile matters as much as cleanliness for paint adhesion. Cleaning removes the glossy, weathered layer on old paint, creating a slightly roughened surface that new paint can grip. This mechanical bonding supplements chemical adhesion for maximum durability. The combination of clean surfaces and proper profile creates ideal conditions for long-lasting paint performance. Following a comprehensive spring cleaning checklist ensures you address all preparation steps systematically.
Practical steps and tips to clean your home exterior effectively before painting
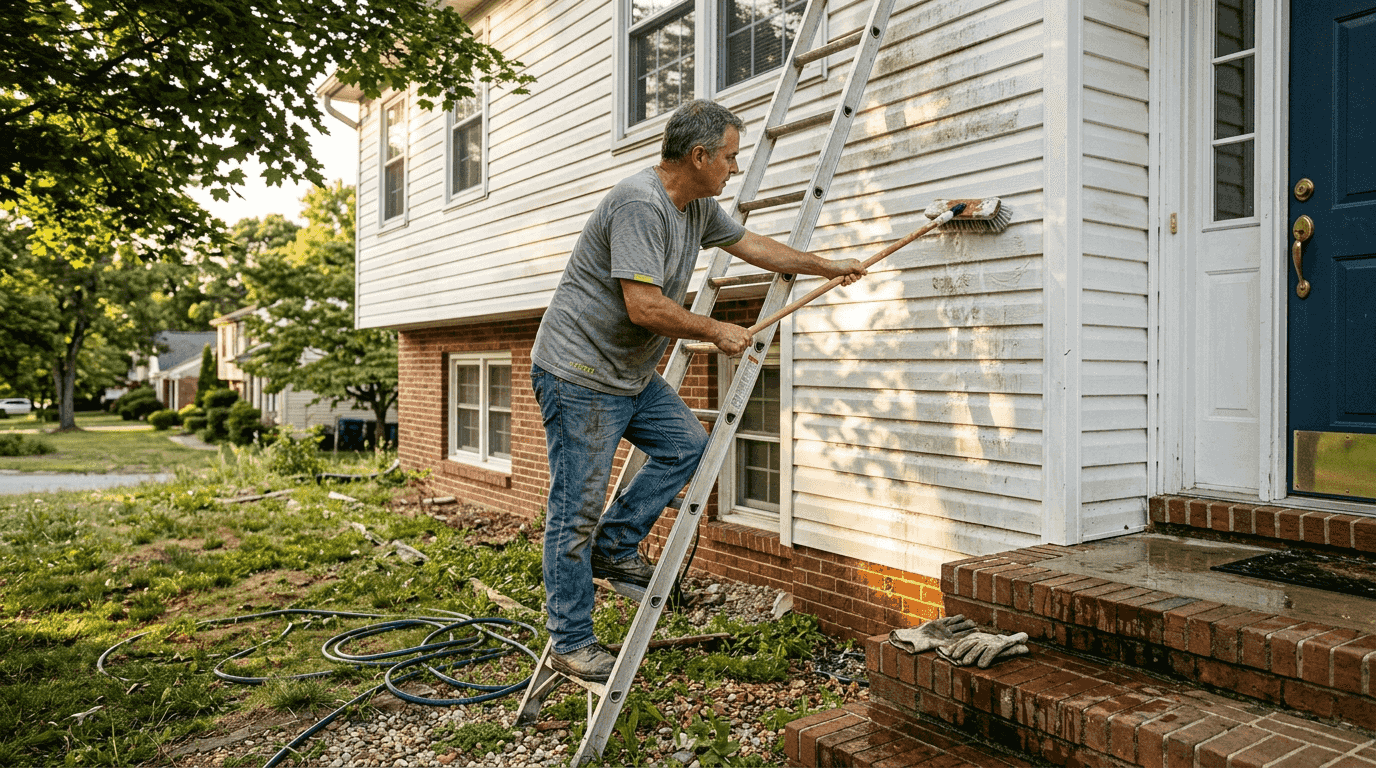
Successful exterior cleaning requires systematic approach rather than random scrubbing. Start with comprehensive inspection walking your home’s perimeter in daylight, noting areas with visible staining, mildew growth, chalking, or damage. Document problem zones with photos to track progress and ensure nothing gets missed. This inspection phase also reveals underlying issues like rotted wood or damaged siding that need repair before painting begins.
Selecting the right cleaning method depends on your surface materials and contamination severity. Vinyl and aluminum siding tolerate moderate pressure washing but benefit more from soft washing techniques. Stucco and EIFS require gentle approaches to avoid driving water into the substrate. Wood siding needs careful pressure control to prevent grain raising or surface damage. Testing your chosen method on a small, inconspicuous area confirms safety before proceeding with the entire exterior.
Essential tools and supplies for effective pre-paint exterior cleaning include:
- Pressure washer or soft wash system with appropriate nozzles and tips
- Exterior-grade cleaning detergents formulated for mildew and dirt removal
- Stiff-bristle brushes for hand scrubbing problem areas and tight spaces
- Safety equipment including goggles, gloves, and non-slip footwear
- Extension wands for reaching second-story areas safely from ground level
- Tarps or plastic sheeting to protect landscaping and outdoor fixtures
The cleaning process follows a top-to-bottom sequence preventing dirty runoff from contaminating already-cleaned areas. Apply detergent starting at the bottom to avoid streaking, but rinse from top down so gravity assists in removing loosened contaminants. Maintain consistent distance between nozzle and surface, typically 12 to 18 inches for most applications. Overlap your cleaning passes slightly to ensure complete coverage without missed strips.
Pro Tip: Schedule exterior cleaning at least 24 to 48 hours before painting to allow complete drying, and check weather forecasts to avoid rain that could recontaminate surfaces or prevent proper drying.
Safety precautions protect both you and your home during cleaning. Never point pressure washers at people, pets, or windows. Avoid using ladders while operating pressure equipment, as the force can cause loss of balance. Keep electrical connections protected from water spray. Consider hiring professionals when working with two-story homes or when you lack experience with pressure washing equipment. The benefits of proper exterior cleaning extend beyond paint preparation to overall home maintenance and curb appeal.
Verifying surface readiness before painting prevents wasted effort. Run your hand across cleaned areas feeling for smoothness and checking for residual grit or powder. Look for uniform appearance without dark streaks or discoloration. Ensure complete dryness by checking shaded areas and inside textured surfaces where moisture hides. Following a detailed exterior cleaning checklist helps ensure you complete every preparation step correctly.
Why choose professional exterior cleaning services before painting
Professional cleaning services bring expertise that prevents costly mistakes during surface preparation. Experienced technicians recognize which contaminants require specialized treatment and select appropriate pressure levels for different siding materials. They understand how Citrus County’s climate affects cleaning approaches and timing. This knowledge prevents common errors like using excessive pressure that damages surfaces or inadequate cleaning that leads to paint failure.

Specialized equipment makes professional cleaning more effective than typical homeowner tools. Commercial-grade soft wash systems deliver precise chemical application and controlled rinsing that removes contaminants thoroughly without surface damage. Professional detergents formulated specifically for pre-paint preparation outperform general-purpose cleaners. The investment in expert preparation pays dividends through extended paint life and reduced maintenance needs. When you’re ready to ensure your painting project starts with properly prepared surfaces, White Diamond Pressure Washing offers the advantages of low-pressure washing techniques that protect your home while delivering the thorough cleaning essential for lasting results. Their pre-paint washing services provide the foundation your exterior painting project needs for maximum durability and beauty.
FAQ
How long before painting should I clean my home’s exterior?
Clean your home’s exterior at least 24 to 48 hours before painting to ensure surfaces dry completely for optimal paint adhesion. Humid conditions or shaded areas may require additional drying time, sometimes up to 72 hours. Check weather forecasts and avoid cleaning if rain is predicted within this window, as moisture recontamination or incomplete drying compromises paint bonding and leads to premature failure.
Can pressure washing damage my home if done incorrectly?
Improper pressure washing can crack vinyl siding, drive water behind exterior cladding, break window seals, and strip paint from surfaces. Using excessive pressure above 1,500 PSI on residential siding or holding the nozzle too close causes these problems. Professional services understand pressure washing safety impact and use appropriate techniques to clean effectively without damage. Following manufacturer guidelines for your specific siding material prevents costly repairs.
What contaminants are most important to remove before painting?
Mildew, algae, dirt, chalking residue, and old paint flakes are the critical contaminants affecting paint adhesion and longevity. Mildew continues growing beneath paint causing blistering, while chalking creates a powdery barrier preventing bonding. Salt deposits from coastal air attract moisture and promote corrosion. Understanding essential exterior contaminants helps you target cleaning efforts effectively for your specific situation.
Is it worth hiring professionals to clean before painting?
Professional cleaning services offer expertise, specialized equipment, and safety that justify the investment for most homeowners. They prevent damage from improper techniques while ensuring thorough contaminant removal that extends paint life significantly. The cost of professional cleaning represents a small fraction of total painting expenses but dramatically improves results and durability. Professional low-pressure washing benefits include proper surface preparation without the risks associated with DIY pressure washing mistakes.