

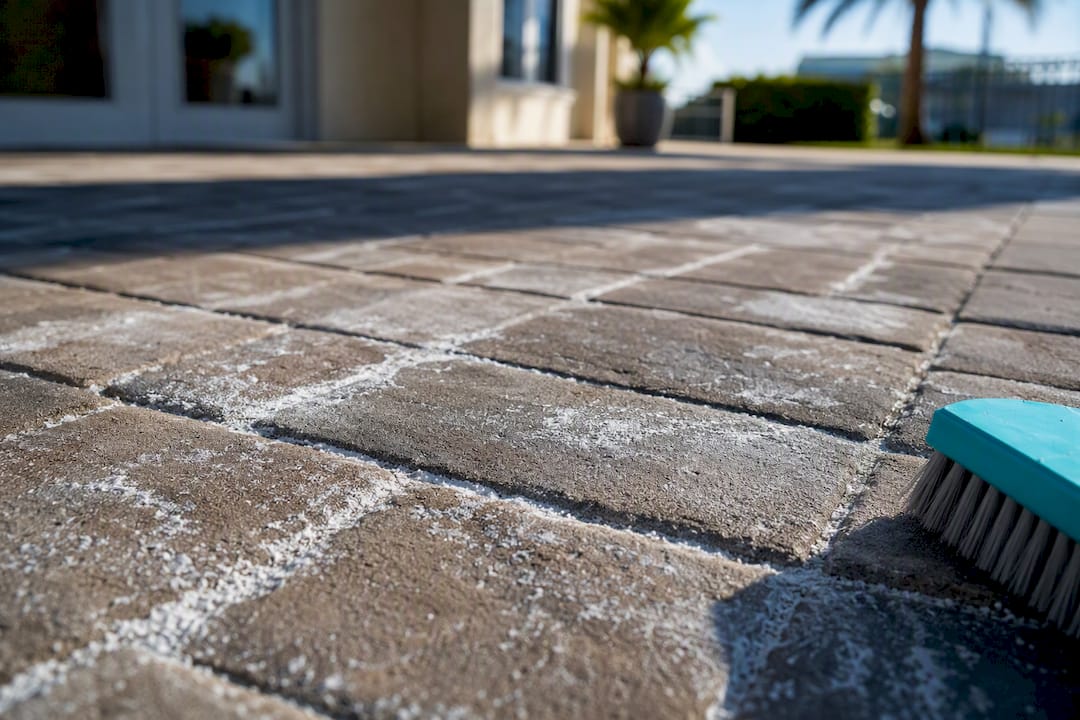
That white, powdery film on your pavers is efflorescence: mineral salts pushed to the surface by moisture and left behind when the water evaporates. Light dusting usually brushes off with a stiff broom. Heavier, crusty deposits need a paver-safe efflorescence cleaner, not a pressure washer set to full blast. Whatever you do, don’t seal over it. Sealing while salts are still active traps them under the surface and ruins the finish.
TL;DR:
- Efflorescence is caused by soluble salts from internal or external moisture sources migrating to the surface of pavers, often appearing months or years after installation.
- Light efflorescence can usually be removed with dry brushing and low-pressure rinsing, but stubborn deposits might require proprietary cleaners tested on a small area first.
- Sealing pavers before full removal of efflorescence or within 24 to 48 hours of dry weather can trap salts, causing a cloudy haze and permanent discoloration.
- Addressing ongoing moisture sources like drainage issues and correcting grading is essential to stop efflorescence from recurring, not just repeated cleaning.
- Professional treatment involves low-pressure cleaning, joint sand restoration, and breathable sealing, often following an inspection and test patch to ensure complete removal.
Table of Contents
- What Is Efflorescence on Pavers, Exactly?
- Where Does Efflorescence on Pavers Actually Come From?
- How Do You Remove Efflorescence From Pavers?
- Should You Seal Pavers Before or After Removing Efflorescence?
- How Do You Stop Efflorescence From Coming Back?
- What Does a Professional Do Differently for Efflorescence?
- A Cleaning Pro’s Take on Efflorescence
- Get Professional Help Removing Efflorescence From Your Pavers
- Sources
What Is Efflorescence on Pavers, Exactly?
Efflorescence forms when water inside a paver or its base dissolves natural salts, mostly calcium hydroxide, and carries them to the surface. Once there, the water evaporates and the salts react with carbon dioxide in the air, leaving behind a chalky calcium carbonate residue. It’s the same chemistry that leaves rings on old flower pots.
There are two flavors worth knowing separately:
- Primary efflorescence shows up on new installations, usually peaking around 60 days after installation as the concrete cures and releases residual salts.
- Secondary efflorescence appears months or years later and signals an ongoing moisture source, like a leaky sprinkler line or bad drainage, rather than a one-time curing event.
It reads as a white haze or fine powder, and it’s far more noticeable on charcoal or brown pavers than on lighter tones. If you’re wondering why your new driveway suddenly looks dusty a couple of months after installation, this is almost always the answer.
Where Does Efflorescence on Pavers Actually Come From?
The salts have to originate somewhere, and figuring out where tells you whether cleaning alone will solve the problem or whether you’re looking at a repeat performance.
Internal sources sit inside the hardscape itself:
- Portland cement in the paver mix, which naturally contains soluble salts
- Contaminated or unwashed bedding sand beneath the pavers
- Mortar or grout that touched the paver surface during installation
- A concrete slab base leaching moisture upward through the joints
External sources are moisture pathways from outside the paver system:
- Sprinkler heads that spray directly onto the surface
- Downspouts dumping water onto a walkway or patio edge
- Poor slope or low spots that pool water after rain
- Groundwater wicking up through a high water table
A quick way to narrow it down: check whether the white patches cluster near a sprinkler head, a downspout, or a retaining wall. Recent installation or repair work nearby is another giveaway, since fresh concrete or mortar is a common contributor.
How Do You Remove Efflorescence From Pavers?
Start with the least aggressive method and escalate only if it doesn’t work. Most homeowners can handle light to moderate efflorescence without calling anyone.
- Dry brush first. Wait for a dry day, then sweep the deposits away with a stiff nylon or polypropylene brush. Never scrub while the surface is wet. That just pushes the salts back into the pores instead of removing them.
- Rinse at low pressure. Use a garden hose or a pressure washer on a wide fan nozzle held at a low angle. The goal is to flush loose residue off the surface, not blast it into the joints, which can drive salts deeper and strip out joint sand.
- Apply a buffered efflorescence cleaner if deposits persist. Professional-grade, proprietary cleaners are formulated to dissolve salts without etching the paver surface the way raw acid does. Test a small, inconspicuous area first. Most products call for a dwell time of five to seven minutes, light scrubbing, then a thorough rinse. Some require a neutralizing step afterward. Follow the label, not a guess.
- Know what to avoid. Skip wire brushes, which leave rust flecks and scratch the surface. Skip raw muriatic acid unless you’re an experienced pro using a manufacturer-approved dilution, since it can permanently discolor concrete pavers. And don’t rely on pressure alone. A pressure-only approach can look like it worked for a week, then leave you with washed-out joints and salts that reappear.
Pro Tip: Photograph the affected area before you start cleaning. If the same white bloom returns in the same spot within a few weeks, you’re dealing with an ongoing moisture source, not a one-time cleaning problem, and no amount of scrubbing fixes that.
Call a professional when you see bonded mineral crusts that won’t budge with a cleaner, efflorescence trapped underneath an existing sealer, or blooms that keep coming back after repeated cleaning. At that point, the fix is usually about diagnosing a moisture source, not scrubbing harder. A walkway cleaning checklist can help you spot warning signs before they become a bigger job.
Should You Seal Pavers Before or After Removing Efflorescence?
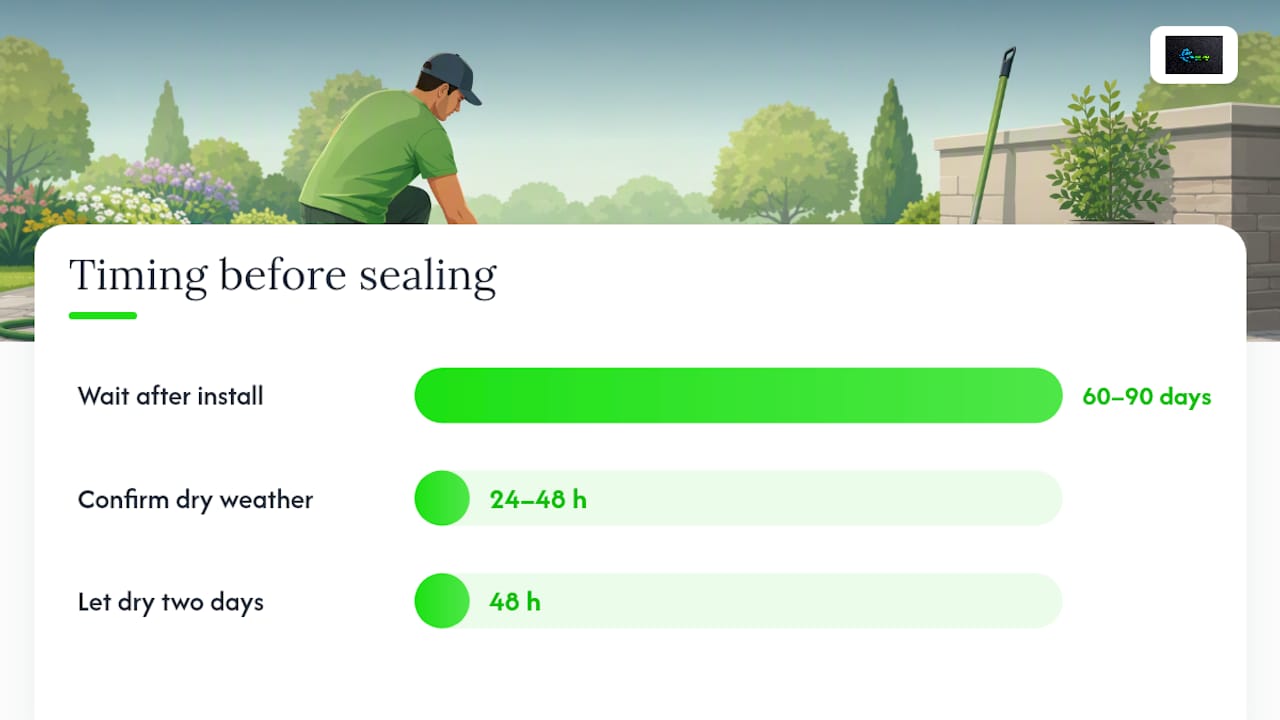
Wait 60 to 90 days after installation before sealing, and confirm the pavers stay clear of white deposits for at least 24 to 48 hours of dry weather first. Sealing over active efflorescence is one of the most common and expensive mistakes homeowners make.
Here’s why it backfires: manufacturer tech notes confirm that efflorescence deposits are water soluble and need to be fully removed with a dry surface before any sealer goes down. Trap those salts under a film and you get a cloudy, milky haze that no amount of reapplication fixes, because the sealer itself has locked the problem in.
Before you seal, run this quick test:
- Clean the surface using the removal steps above.
- Let it dry completely for two full days with no rain.
- Inspect closely in direct sunlight for any white residue, especially in joints and low spots.
- If clear, choose a breathable, penetrating sealer rather than a heavy film-forming topcoat, particularly in humid or coastal climates where moisture keeps moving through the paver system.
A breathable sealer lets residual vapor escape instead of building pressure under a hard shell, which matters more than most sealer marketing admits.
How Do You Stop Efflorescence From Coming Back?
Cleaning treats the symptom. Fixing the moisture pathway treats the cause, and that’s the only approach that actually keeps efflorescence from returning season after season.
- Improve grading and slope so water moves away from the paver surface instead of pooling on it.
- Extend downspouts well past the paver edge and correct any low spots that collect standing water.
- Replace contaminated bedding sand with clean, washed sand during any repair or re-leveling work.
- Avoid hardening joint stabilizers that seal the surface tight, since they often trap moisture underneath rather than letting it drain.
- Reduce sprinkler overspray onto hard surfaces and inspect nearby walls or concrete for mineral runoff draining onto the pavers.
- Keep up with routine maintenance: sweep debris, check joint sand levels, and only reseal when the surface has genuinely dried and cleared.
ICPI guidance is direct on this point: efflorescence is a cosmetic issue, not a structural one, but preventing it for good comes down to correct installation and moisture control, not repeated cleaning cycles.
Pro Tip: If efflorescence keeps returning in the exact same spot every few months, check what’s directly underneath or beside that section, a slab edge, a wall footing, or a buried pipe joint, before you clean it again. The pattern is the clue.
What Does a Professional Do Differently for Efflorescence?
A professional approach isn’t about stronger chemicals. It’s about sequencing the work so nothing gets trapped, scratched, or washed out along the way.
- Inspect the affected area and run a test patch before committing to any product across the whole surface.
- Apply a buffered, proprietary cleaning solution at low pressure rather than relying on pressure alone to strip deposits.
- Rinse with high water volume at a controlled, low-pressure setting instead of blasting the joints.
- Reset joint sand where the rinse process has disturbed it, then confirm the surface is fully dry before recommending a sealer.
- Protect nearby landscaping and use proper personal protective equipment when handling efflorescence removers.
Multiple visits are normal for stubborn or secondary efflorescence tied to an ongoing moisture source. A single cleaning rarely resolves a drainage problem, and any professional worth hiring will say so upfront rather than promising a one-visit fix. If you’re still unsure whether pressure washing is safe for your specific paver type, this guide on pressure washing and concrete damage breaks down what settings actually matter.
A Cleaning Pro’s Take on Efflorescence
Most efflorescence problems get worse from impatience, not from the salts themselves. Brush first, document what you see, and save the aggressive treatments for deposits that actually need them. If it keeps returning, you’re fighting drainage, not dirt.
— Bobby
Get Professional Help Removing Efflorescence From Your Pavers
Scrubbing bonded mineral crusts off a patio on a Saturday afternoon isn’t anyone’s idea of a good time, and using the wrong cleaner or too much pressure can strip out joint sand you’ll be replacing for years. Professional services treat efflorescence with soft-wash, low-pressure methods built to lift salt deposits without stripping sand or etching the surface, then follow up with joint sand restoration and a breathable sealer once the pavers test clean and dry.

A visit typically starts with an inspection and a test patch, so a written recommendation can be provided before any chemical touches the full surface. This often includes flagging drainage issues that could cause efflorescence to return, not only cleaning what’s visible today. If your driveway, walkway, or patio has that chalky white look and you’d rather not gamble on a DIY fix, request a free estimate and get a straight answer on what it will take to clear it for good.
Sources
- Efflorescence before sealing | SurfaceBlueprint
- How to clean efflorescence | Barkman Concrete (blog)
- Tech Spec 5: Cleaning, sealing & stabilizers | UNI-Group USA
- Interlocking Concrete Pavement Institute (ICPI)