

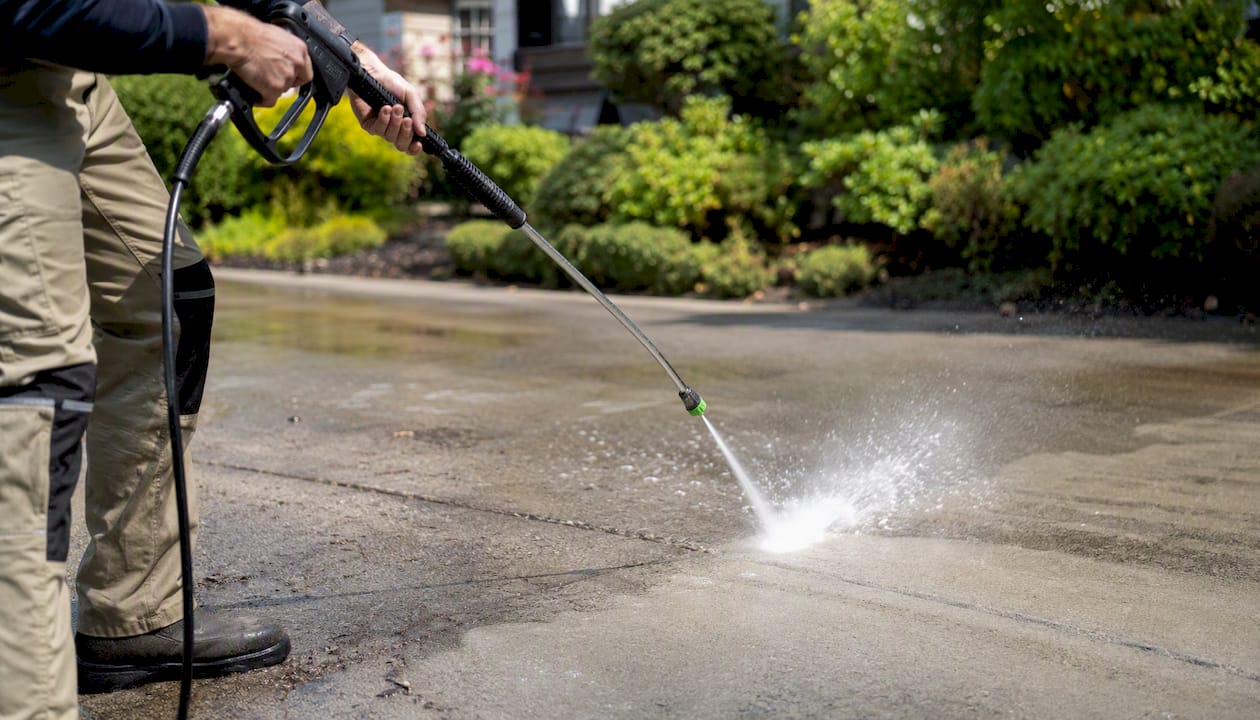
Yes, pressure washing can damage concrete, and it happens more often than most homeowners expect. The two things that matter most: the nozzle you choose and how far you hold it from the surface. Use a 0° or 15° tip at close range and you can etch or pit the surface quickly. Stick with a 25°–40° fan tip or a rotary surface cleaner, maintain a 10–12 inch standoff, and the risk drops sharply.
The damage to watch for immediately: wand marks (light or dark streaks running in the direction you moved), a rough sandpaper texture where the surface used to feel smooth, and small pits or chips. If you see any of those mid-job, stop and inspect before continuing.
Pro Tip: If you’re cleaning near a storm drain, EPA stormwater guidance recommends containing or diverting runoff from detergent-based washes. Check your local municipality’s rules before you start.
For homeowners who’d rather skip the risk entirely, Whitediamondpressurewashing offers low-pressure soft washing as a material-safe alternative to high-pressure concrete cleaning.
Key Takeaways
Pressure washing concrete damage is largely preventable with the right nozzle, correct standoff distance, and a pre-clean inspection, but once the cream layer is etched away, the surface requires professional resurfacing to restore.
| Point | Details |
|---|---|
| Nozzle choice is the biggest risk factor | Use a 25° or 40° fan tip; never use a 0° or turbo nozzle on concrete. |
| Distance and dwell time cause most etching | Hold the wand 10–12 inches from the surface and keep it moving at all times. |
| Etching is permanent, streaking often isn’t | Rough texture and pitting need professional repair; tiger striping may correct with a surface cleaner. |
| Reseal within 24–48 hours after cleaning | Pressure washing strips sealant; resealing restores water and stain protection. |
| Whitediamondpressurewashing offers a lower-risk path | Soft-wash and low-pressure services in Citrus County protect the surface finish while still cleaning effectively. |
Table of Contents
- How pressure washing physically damages concrete
- Signs that a pressure washer has already damaged your concrete
- How to clean concrete safely, step by step
- What nozzle and tool should you actually use?
- When is the damage reversible, and what are your repair options?
- How long to wait before sealing, and which sealer to choose
- When should you call a professional instead of DIYing it?
- Why low-pressure and soft-wash methods are safer for many concrete surfaces
- What I’ve seen on real driveways, and why conservative cleaning matters
- Whitediamondpressurewashing protects your concrete the right way
- Sources
How pressure washing physically damages concrete
The surface of a concrete slab isn’t uniform all the way through. The top 1/16 to 1/8 inch is a thin, troweled layer called the “cream” or paste, made of cement and fine particles. It’s what gives finished concrete its relatively smooth, dense appearance. Once that layer is breached, the surface becomes permanently porous and rough. You can’t re-trowel it back into place. Resurfacing or a professional overlay is the only real fix.
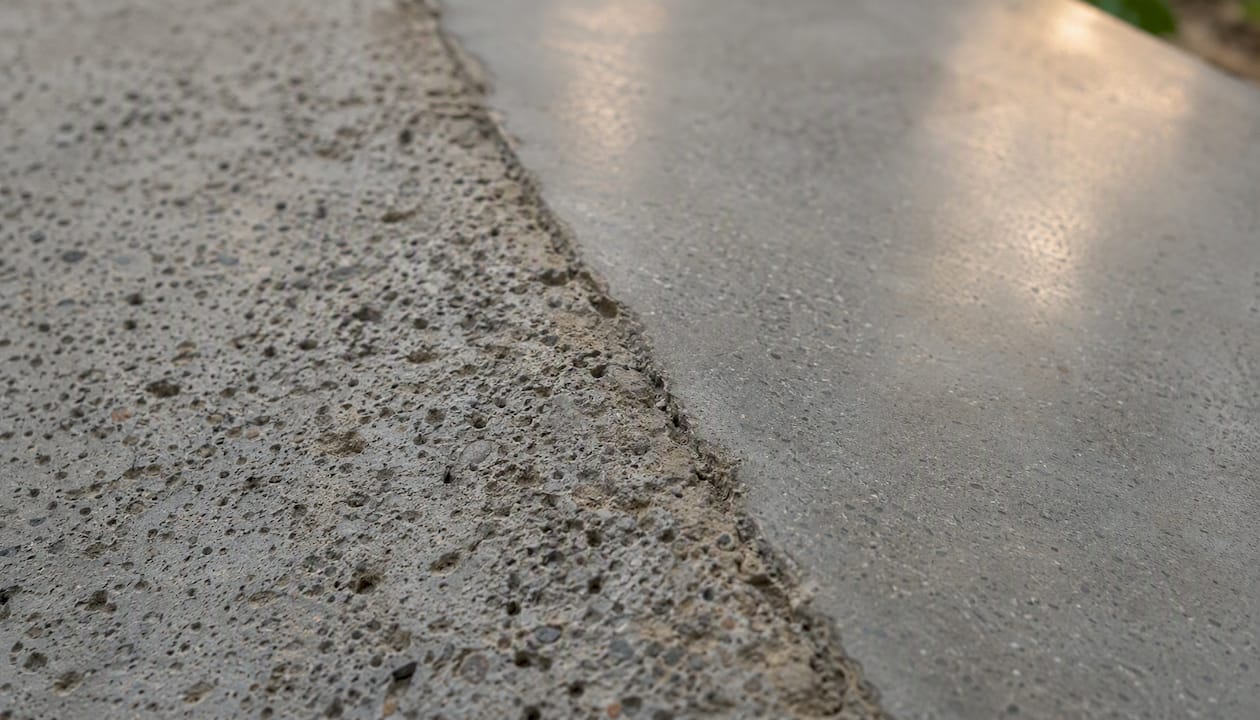
Here’s how the physics work against you. A narrow-angle nozzle concentrates the same water volume into a smaller contact area, multiplying the force per square inch at the surface. A 0° red tip fires a pinpoint stream that can score concrete like a chisel. A 15° yellow tip isn’t much better on older or vulnerable slabs. By contrast, a 25° green or 40° white tip spreads that force across a wider fan, reducing surface pressure to a level most intact concrete can tolerate.
Distance compounds the problem. Hold the wand 4 inches from the surface instead of 12, and the jet hasn’t had room to disperse. The force arriving at the slab is dramatically higher than the nozzle angle alone would suggest. Linger over one spot for more than a second or two and you’re concentrating that force in a single zone, which is exactly how pitting starts.
PSI and GPM interact in a way that catches DIYers off guard. Consumer Reports notes that technique and nozzle selection are the primary safety controls for different materials. A consumer unit advertising 3,500 PSI with 1.2 GPM pushes a narrow, high-force stream that’s hard to move fast enough to avoid damage. Professional systems tend to run moderate PSI with higher GPM, which rinses effectively without requiring the operator to crank pressure to compensate for low flow.
Concrete age and condition change the equation significantly. A slab poured within the last 12 months is still curing and far more vulnerable than a 10-year-old driveway. Spalled areas, hairline cracks, and surfaces where the sealer has already worn away are all higher-risk zones. Sealed concrete can also be stripped of its protective layer by aggressive washing, leaving the underlying slab exposed.
Holding a wand too close, using a narrow-angle nozzle, or repeating passes over the same spot are the three most common causes of irreversible etching on residential concrete. Any one of them alone can cause damage; all three together will.
Pro Tip: On a new slab that is not fully cured, stay at a gentle pressure regardless of nozzle choice. On intact older slabs, field guidance from Linea puts the safe range at 2,500–3,000 PSI with a 25° tip at 10–12 inches.
Signs that a pressure washer has already damaged your concrete
Catching damage early lets you stop before a surface issue becomes a structural one. Here’s what to look for:
- Wand marks: Light or dark streaks running in the direction you moved the wand. These are the most common sign and can range from cosmetic to serious depending on depth.
- Tiger striping: Alternating light and dark bands across the slab, usually caused by inconsistent speed or overlap. Often fixable with a surface cleaner and correct technique.
- Rough, sandpaper texture: Run a gloved fingertip across the surface. If it feels like 60-grit sandpaper where it used to feel smooth, the cream layer is gone. According to Iron Eagle Coatings, true etching where surface material has been physically removed is permanent and requires resurfacing.
- Pitting: Small craters or divots, usually from a 0° or turbo nozzle held too close. Pitting is not cosmetic.
- Exposed aggregate: If you can see the gravel or stone beneath the surface, the cream layer is fully gone in that area.
- Chips: Larger fragments missing from the surface edge or field, often from turbo nozzle use.
- Joint sand washout (pavers): If you’re cleaning pavers rather than poured concrete, pressure washing can displace the joint sand between slabs. Lose that sand and the pavers can shift, and weeds move in fast.
Pro Tip: Before calling a contractor for a repair estimate, photograph the damage in good light from multiple angles. A close-up showing texture change next to an undamaged section gives the contractor a clear baseline and helps you compare bids accurately.
Severity matters for deciding what to do next. Light wand marks on an otherwise intact surface may correct with a proper re-clean using a surface cleaner. Rough texture, pitting, or exposed aggregate means the damage is done and you’re in repair territory.
How to clean concrete safely, step by step
Getting this right is mostly about preparation and restraint. Here’s the sequence that keeps concrete intact.
Before you start:
- Assess the slab’s age and condition. Look for cracks, spalling, or areas where the sealer has worn away. Any of those zones need extra caution or should be skipped entirely.
- Check the weather. Avoid washing in direct sun on a hot day (surface dries too fast, leaving residue) or when rain is expected within a few hours.
- Review runoff. If you’re using a detergent, check EPA stormwater guidance for your area and keep wash water away from storm drains where possible.
- Note whether the surface has been sealed. A sealed slab is more forgiving but will likely need resealing after washing.
Equipment checklist:
- Pressure washer: 2,000–3,000 PSI with at least 2.0 GPM for most residential driveways
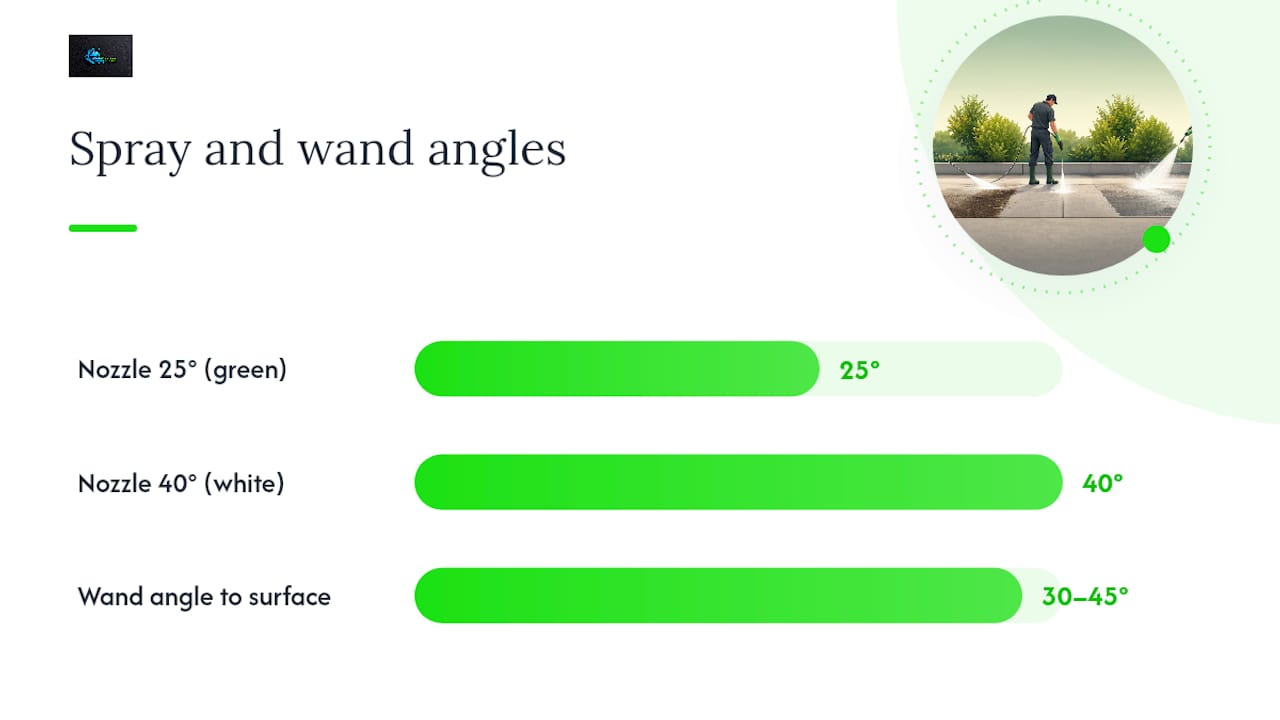
- Nozzle: 25° (green) for general cleaning, 40° (white) for lighter work or older slabs
- Surface cleaner attachment: strongly recommended for any area over roughly 200 square feet
- Concrete degreaser or cleaner: for oil stains and heavy organic growth
- PPE: safety glasses, closed-toe shoes, and hearing protection for gas units
The cleaning process:
- Pre-treat stains with a concrete degreaser. Let it dwell for 5–10 minutes before rinsing.
- Do a test spot in an inconspicuous area. Use your chosen nozzle at 12 inches and make two passes. Wait 30 seconds and check for texture change or streaking.
- If the test spot looks clean and undamaged, proceed. If you see striping or roughness, switch to a 40° tip or a surface cleaner.
- Work in overlapping passes, moving at a consistent walking pace. Never stop moving while the trigger is pulled.
- Maintain 10–12 inches between the nozzle and the surface for a wand with a 25° tip. A surface cleaner handles standoff distance automatically.
- Angle the wand 30–45° to the surface rather than straight down. This deflects force rather than driving it straight into the slab.
- Rinse from the high end of the slab toward the low end to move debris away from the clean area.
- After washing, inspect the full surface for wand marks or texture changes before packing up.
Safety warnings:
- Never use a 0° (red) or turbo nozzle on concrete. The concentrated force will etch the surface.
- Never point the wand at people, pets, or windows.
- On pavers, watch for joint sand displacement after each pass. If sand is washing out, reduce pressure or switch to a surface cleaner immediately.
Pro Tip: For older concrete, stamped surfaces, or slabs with visible wear, skip the mechanical pressure entirely and use a soft-wash approach instead. Detergent does the work; low pressure just rinses it off.
What nozzle and tool should you actually use?
The color-coded nozzle system is the fastest way to avoid mistakes. Here’s what each one does to concrete:
- Red (0°): Pinpoint stream. Never use on concrete. Will etch or score the surface on contact.
- Yellow (15°): Narrow fan. Acceptable only for stripping paint or removing stubborn deposits from very hard, intact surfaces. High damage risk on residential driveways.
- Green (25°): The standard choice for concrete cleaning. Wide enough to distribute force, narrow enough to move grime. Use at 10–12 inches.
- White (40°): Gentler fan. Best for older slabs, sealed surfaces, or a final rinse pass. Lower cleaning power but much lower damage risk.
- Black (65°): Soap nozzle only. Low pressure for applying detergent.
Surface cleaners deserve more attention than they usually get. A rotary surface cleaner attaches to your wand and spins two small nozzles in a circular pattern under a shroud. The result is even pressure distribution across the entire cleaning path, no streaking, and a consistent standoff distance you don’t have to think about. Surface cleaners reduce streaking and lower etching risk on large slabs, and they’re faster than wand work on anything bigger than a sidewalk. Most equipment rental shops carry them for around $30–$50 per day.
On the PSI vs. GPM question: a unit with 2,500 PSI and 3.0 GPM will generally clean more effectively and more safely than one with 3,500 PSI and 1.5 GPM. Higher flow rate carries debris away. When flow is low, operators tend to slow down or move closer to compensate, and that’s when damage happens.
Pro Tip: Avoid common pressure washing mistakes like using a turbo nozzle “just for tough spots.” Turbo nozzles spin a 0° stream in a circular pattern — they feel effective because they are, but that effectiveness comes from concentrated force that etches concrete fast.
When is the damage reversible, and what are your repair options?
Not all pressure-washing damage looks the same, and the repair path depends on what actually happened to the surface.
Reversible issues:
- Tiger striping and light wand marks: If these are from uneven washing rather than true etching, a technician using a surface cleaner and correct technique can often correct them. The streaks are a residue or sheen difference, not a material loss.
- Sealer removal: Pressure washing strips sealant. That’s fixable. Clean the surface properly, let it dry, and reseal.
- Joint sand loss on pavers: Washout is fixable if caught quickly. Re-sand with kiln-dried sand and compact it back into the joints.
Permanent damage:
- Etched cream layer: Once the thin paste layer is gone, the surface is permanently rough and porous. No amount of re-washing fixes it.
- Pitting and exposed aggregate: These require professional intervention. Options include diamond grinding followed by re-polishing, a polymer-modified micro-topping or overlay, or partial slab replacement for severe cases.
- Spalling: If sections of the surface are flaking away, that’s a structural concern, not just cosmetic.
DIY repair options for minor damage:
- Light etching with no pitting: apply a penetrating concrete sealer to reduce porosity and slow future staining. It won’t restore the cream layer but protects what’s left.
- Small pitted areas: a concrete patching compound (available at any home improvement store) can fill individual pits. Feather the edges carefully and seal after curing.
- Paver joint sand loss: sweep kiln-dried polymeric sand into the joints, compact with a plate compactor or hand tamper, and mist lightly to activate the binder.
For anything beyond those three scenarios, call a concrete contractor. After etch repair, the DAS Concrete guidance is clear: reseal the repaired surface, because etching removes the layer where sealer was housed and leaves the concrete unprotected against water and stains.
Pro Tip: Don’t try to fix etched lines by increasing pressure on the next wash. Professionals use material-safe detergents, diamond grinding, or a micro-topping overlay. More pressure on an already-etched surface just removes more material.
How long to wait before sealing, and which sealer to choose
Sealing after a wash isn’t optional if you want the concrete to stay protected. Pressure washing strips whatever sealer was on the surface, and bare concrete absorbs stains and moisture much faster.
The drying window matters. Wait 24–48 hours after washing before applying any sealer. In high humidity or cooler temperatures (below 60°F), lean toward the longer end. Sealing over damp concrete traps moisture underneath, which can cause the sealer to cloud, peel, or fail within months.
Sealer types and when to use each:
- Penetrating silane/siloxane sealers: Soak into the concrete rather than forming a film on top. Best for driveways and walkways that get heavy foot or vehicle traffic. Invisible finish, won’t peel, and typically last 5–10 years. The right choice for most residential concrete.
- Film-forming acrylic or urethane sealers: Sit on top of the surface and create a visible sheen (matte to high-gloss). Better for decorative or stamped concrete where appearance matters. More susceptible to peeling if applied over damp concrete or in direct sun.
Pro Tip: Before sealing, do a moisture test: tape a 12-inch square of plastic sheeting to the concrete and leave it for 24 hours. If condensation forms on the underside, the slab isn’t dry enough. Resealing after any etch repair restores stain resistance and water protection that the cleaning process removed.
When should you call a professional instead of DIYing it?
Some situations are genuinely beyond what a homeowner should attempt. Here’s how to tell the difference.
Red flags that mean call a pro:
- Large-area spalling (more than a few square feet)
- Exposed aggregate across a significant portion of the slab
- Widespread etching with visible texture change
- Structural cracks (wider than a hairline, or with vertical displacement)
- Widespread joint sand loss on a paver driveway or patio
Questions to ask any contractor before hiring:
- How do you assess whether etching is surface-level or has penetrated the cream layer?
- Do you use diamond grinding, micro-topping overlays, or both? When do you choose one over the other?
- Can you show before/after photos from a similar concrete repair job?
- Are you licensed and insured for concrete repair work in Florida?
- What’s your post-repair sealing strategy, and what product do you use?
- What does the written warranty cover, and for how long?
When comparing bids, ask each contractor to specify the repair method in writing. “Resurface the driveway” means different things to different contractors. A polymer-modified overlay and a thin paint-on coating are not the same repair.
Pro Tip: Use the vendor evaluation checklist from Whitediamondpressurewashing when vetting contractors. It covers the questions homeowners most often forget to ask, including insurance verification and post-service guarantees.
Why low-pressure and soft-wash methods are safer for many concrete surfaces
High-pressure washing is the default assumption, but it’s not always the right tool. For a meaningful category of concrete surfaces, low-pressure or soft-wash methods produce better results with less risk.
Soft washing uses biodegradable detergents or biocide solutions applied at low pressure (typically under 500 PSI) to break down organic growth, mold, mildew, and algae at the source. The chemistry does the cleaning; the low-pressure rinse just removes the residue. There’s no mechanical force concentrated on the surface, so cream-layer loss and joint sand washout aren’t concerns.
The surfaces where soft wash is the recommended approach:
- Older concrete (15+ years) where the cream layer is already thin or partially worn
- Stamped or decorative concrete where the surface texture and color are part of the finish
- Sealed concrete where you want to clean without stripping the sealer
- Shaded or coastal driveways with heavy algae, mold, or lichen growth — organic stains that respond better to chemistry than to pressure
For concrete surfaces with heavy organic growth, soft washing with a biodegradable cleaner removes the stain at its root. High pressure alone tends to blast the surface layer without fully killing the organism, which means regrowth happens faster.
Whitediamondpressurewashing uses insured technicians, biodegradable cleaning solutions, and industry-standard low-pressure equipment for concrete and surface cleaning in Citrus County. Their soft-wash process combines a chemical pre-treatment with a gentle rinse, which reduces the need for high-pressure passes and protects the surface finish.
Pro Tip: Combining a soft-wash pre-treatment with a gentle 40° rinse pass is often more effective than a single high-pressure clean. The detergent loosens organic matter that pressure alone can’t fully remove, and the low-pressure rinse clears it without stressing the surface.
What I’ve seen on real driveways, and why conservative cleaning matters
The most common mistake I see isn’t using the wrong nozzle once. It’s using the wrong nozzle repeatedly because the results looked fine the first time. Concrete is forgiving up to a point, and then it isn’t. The cream layer doesn’t give you a warning before it’s gone.
The homeowners who end up needing resurfacing almost always describe the same sequence: they rented a gas pressure washer, used the yellow or turbo tip because it cleaned faster, and got a great-looking driveway. Then they did it again the next year. By year three, the surface felt rough, the stains came back faster, and the contractor told them the cream was gone.
That’s the case for conservative cleaning choices — as any homeowner cautious about landscaping or exterior maintenance knows, avoiding common mistakes upfront is crucial; see Removing tree stumps mistakes for a related guide on how to prevent costly errors. Not because pressure washing is inherently dangerous, but because the margin for error is smaller than it looks, and the consequences of getting it wrong are permanent. If you’re unsure about your surface’s condition or you’re working on stamped, older, or previously damaged concrete, a soft-wash or low-pressure service is the lower-risk path. Request a free estimate before committing to anything mechanical.
Whitediamondpressurewashing protects your concrete the right way
Concrete cleaning done wrong costs more to fix than it ever cost to clean. Whitediamondpressurewashing takes the risk off the table for homeowners in Citrus County and surrounding areas with a service model built around material preservation, not just surface results.

The team uses soft-wash and low-pressure techniques for driveways, walkways, and patios, with biodegradable cleaners matched to the surface type. For large slabs, rotary surface cleaners replace wand work to eliminate streaking and keep standoff distance consistent. Sealing services are available after cleaning to restore the protection that washing removes. Every job is handled by insured technicians who assess the surface condition before choosing a method, not after.
If your concrete has existing etching, pitting, or visible wear, the team can assess whether cleaning will help or make things worse before a single drop of water hits the surface. Book a free estimate or browse the full service catalog to see what’s covered.
Sources
- How to Pressure Wash a Driveway Without Damaging Concrete — Linea
- Does Pressure Washing Damage Concrete? — Iron Eagle Coatings
- Can You Pressure-Wash It? — Consumer Reports
- DAS etch repair guide 2023 — DAS Concrete
- Pressure washer lines on pavers — Kingsway Pave Sealing
Recommended
- Prevent surface damage: essential guide for pressure washing safety – white-diamond-pressure
- Avoid These Pressure Washing Mistakes: Safer, Cleaner Home – white-diamond-pressure
- Role of Water Pressure in Safe Exterior Cleaning – white-diamond-pressure
- Pressure Washing Safety – How It Protects Your Home – white-diamond-pressure
2 thoughts on “Can Pressure Washing Damage Concrete? What to Know”